Pages

2012/08/27

Quality Inspection and other thoughts


Recently, we met an experienced ERP user Doug from America. He proposed some very core enquiries about 2BizBox's quality inspection function. We got different understandings on the quality inspection process, but we do agree to his propose and we will make 2BizBox better in the future.

Today I'd like to introduce the current 2BizBox's quality inspection box. In company settings, you can set whether the Inspection Report is required when receiving.

If not, you can receive and create location for new coming parts first, and inspect parts, create Inspection report and NCR report later. However, if you've checked this box, you have to inspect the part before it goes to the inventory.

To create an Inspection Report, just go to "Quality Box -IR", click "Add IR":
 
You will see, an IR must be created from the PO or WO.

Here comes the problem: If we don't receive the parts, how would we know when the parts has actually arrived on the dock and someone is inspecting it?

We thought that it is not necessary to show the arrival status of a PO through the system. Warehouse staff can simply use the notice function to tell someone in quality department. Then the quality inspection staff begin to make Inspection report and you know someone is inspecting it. The inspection report will tell how many unqualified products will be returned to the vendor. 

During Inspection, we find some parts with quality problems, so we'd like to return them to the vendor. Usually, we can create an RTV (Return to Vendor, in Purchase Box). However, you might have found that parts in an RTV should be get out from inventory. Yes, in this situation, we do not need to create an RTV. We simply send the parts back to the vendor directly.
Now we come to another question: how do we keep track of the return shipment, and associated accounting (debit) against the Vendor invoice?

The answer is: 2BizBox cannot do logistics tracking. Usually when we return several product to our vendor due to quality problem, they will resend good products to us again. We need staff to keep an eye on these issues, and make records. Also, the purchase order won' t be closed until we receive all the products to the warehouse. 


We believe the software can be our assistant, but cannot replace people. Also we appreciate what Mr. Doug says: "Design the system to standardize each task in the most efficient manner possible, capturing as much information as necessary to manage all aspects of the business efficiently". 2BizBox has achieved a lot till today, but we still have huge tasks to accomplish. We would like you to post any of your puzzle and advise in our forum: http://www.2bizbox.com/forum/index.php, to help us growing quickly and stably.

2012/08/09

Install 2BizBox on CentOS Linux


2BizBox Linux version is published recently. This manual will guide you through the installation of 2BizBox onto CentOS Linux. 
Before installation, please make sure you’ve installed MySQL, Port 3306. 

1. Extract “2BizBox_Setup.tar.gz” and run “install.sh”. You will see the following screen:


2. Press <Enter> to continue. You will see our User License Agreement.

Press <Space> to read more:

Enter ”y” or “Y” to agree on the User License Agreement and continue the installation process. Press <enter> to get into the following installation menu with 5 tasks. Choose task 1 by enter “1” to start installation:

3. The program will install JDK and Jboss automatically as showed in the following screen:


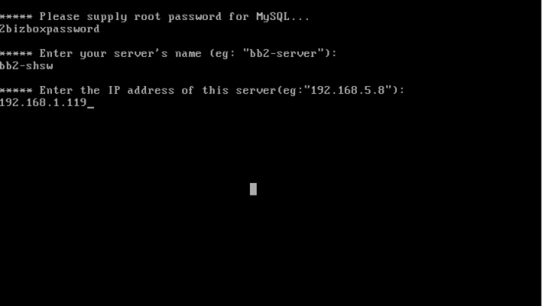
4. Enter MySQL password and press <Enter> to continue:


5. Enter server’s name starts with “
bb2-“ and press <Enter> to continue:

6. Enter the IP address of the server. Press <Enter> to continue:


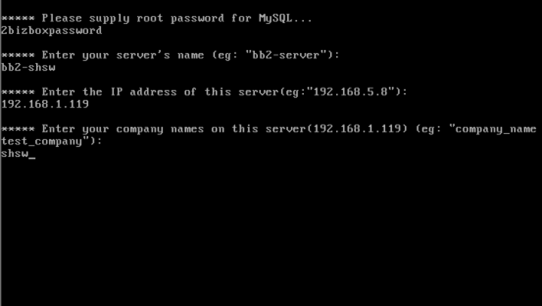
7. Enter your company name on the server. If you want to add multiple companies, enter company names and separate them by “space”, e.g. “shsw shswtest”. It’s better not use hyphen “-“ in the company names. Press <Enter> to continue:


8. In the following screen, the program will ask you if you want to add more servers. If you have several companies, or want tp create a test company account, enter “y” and press <Enter> to continue:


9. If you enter “y” to add another server, such as a “test server”, the program will ask you to enter server’s name, IP address and company names as the previous steps 5, 6, 7 and 8. Enter “n” to finish adding servers and press <Enter> to continue:

10. The following screen will inform you that the program has been installed successfully. You will see an address to visit 2BizBox and the default user name and password. Finally, enter “YES” to restart your server:

2012/08/03

Share Engineering Information with other Companies


This manual demonstrates how to share your part information with another company. By “share” we mean that another company is able to import the part information from your common server. Shared information includes the part’s revision, language descriptions, BOM, NCR, and MFG drawings. It needs a separate task to accomplish drawing sharing. Usually “share” is from the mother company to its children companies. When the mother company makes change to the shared parts and drawings, the children companies will also received the changes.

In this manual you will see how the company “SERVA SOFTWARE LLC” exports the part “Z01-01-001” so that the company “2BIZBOX LLC” could import the part. Two functions are involved in this manual: “Engineering Sharing Control” in Engineering Box and “Scheduler Management” in Control Panel.

1. Add Engineering Sharing

1.1 Share by rule

Before exporting the part, SERVA SOFTWARE LLC creates an Engineering Sharing company for 2BBIZBOX LLC first. In “Engineering Box – Part Master – Engineering Sharing Control”, click “Add Engineering Sharing”:


The “Company ID” and “Company Name” doesn’t relate with the Address Book. Effective and expiry date means during which period you want to share the part. Then click “Add” to update Engineering Sharing:

Fill in required information. We provide three “Sharing Rules” to indicate which parts to share:

1. Part start letters (or numbers). E.g. by input “P” in the textbox means to share all parts start with “P”;
2. Click picker. In the pop up Pick Part Window, select parts you want to share.
3. Share parts in an Engineering Group. It requires enabling “Multi-Company Part” in control panel and setting up engineering group.

Click “Update” to finish setting sharing part and return to Engineering Sharing UI. Click “Sharing Parts under Rule” to see the shared parts:

1.2 Share manually

Also you can click “Sharing Parts Manually - 2Add” to add parts manually. This is the fourth method to add shared parts.
Select start part # and end part # in part list, click ‘2Add”. Check Parts you need, or check “Part #” to select all.
If you check “2Add from BOM”and select the BOM #, click “2Add”.You can add all parts under the BOM.
2. Add “Export Eng Share Part” Schedule Task
2BizBox realizes part sharing by scheduling timed exporting and importing tasks in “Scheduler Management”. In “Control Panel – Scheduler”, click “Schedule Management”:


This is a blank task list, so we click “Add” to add a new task:
 
Explanations on adding a task:
 
Name
Task name, here we choose “export eng share part” through dropdown menu.
Description
Automatically filled along with task name.
Time Range
Define the task time and frequency, e.g. we set “weekly, on Monday”.
Scheduler Run Time
Define when to run the task. Choose time “Hour” and “Min” and click “+” to add time.
Start Date & End Date
Task period, normally set the same as sharing period
Parameters Format
Default setting
This is the most important setting. First, click picker to open the parameters setting window. Choose Address ID added in Engineering Sharing and then set a path to export the part information. (See Image below)
Copy Email To/Report Exception To
Email address to send task reports
Send Notice
Choose users to send notice through 2BizBox
Retry Times/ Retry Interval (Minute)
If the task fails, how many times to retry the task and how many minutes to wait before the next try
Comments
Any comments you want to add to this task

After adding the required task information, click “2Add” and return to “Scheduler Management”. In this way, a scheduler task is created. 2BizBox will run the export task on setting time.

Till now, SERVA SOFTWARE LLC has finished setting for sharing the part “Z01-01-001”.

 
3. Add “Import Eng Share Part”
To get the sharing part information, 2BIZBOX LLC need to schedule a task to import the part. In “Schedule Management”, 2BIZBOX LLC adds a task “Import Eng Share Part”:


Fill in task information as showed in Step 2. Make sure the import time is a bit later than export time, so as to keep the latest updates. Also, import path should be same as export path in parameters setting.

Then click “Add” to create a new import task.


Till now, 2BIZBOX LLC is able to get part information from SERVA SOFTWARE on schedule.

4. Run Scheduler for Test
Click “detail” at the end of the task line, you can check the task detail information and test the task by clicking “Run Scheduler”:


First, SERVA SOFTWARE LLC runs the export task.

After system shows the operation is finished, go to check the export path and you will see the exported part information documents.

At the same time, a task notice will be sent out if you’ve set notice email and receiver.

Then, 2BIZBOX LLC runs the import task. Related email address and receiver will receive the task notice. After the operation is finished, we found that the part “Z01-01-001” appears in part list.

Click the Part #, a notice of Part import log will pop up:


Click “Detail” to “Review” or “Review All”:
You can review logs with the same part together:
Not only in part detail, this notice of new import log will appear in all orders related to the part, e.g. an open work order, sales order, purchase order, etc.

On Scheduler Management page, 2BizBox also allows you to search the scheduler task log. Set the searching period, task name and click “2Search Scheduler Task Log”:

The engineering staff must search this log regularly to make sure not missing any new imports information and review them on time.