Pages

2012/06/29

Impregnable Security Strategy for 2BizBox ERP

Data security is a big issue to any ERP software. When your 2BizBox ERP is implemented and ready for daily business, have you figure out a sound security strategy to protect and manage your system? In this article, we would like to discuss with you about the basic security settings for 2BizBox.

1. Security in operation system level.
It’s okay for you to download 2BizBox and install it on local host for testing. However, when you decide to implement 2BizBox and run it for daily business, a clean and independent server is indispensable.

We’ve received many enquiries like: “my company is implementing 2BizBox ERP. May I install it on a 512MB RAM computer with Window 2000 system?” Or “is it possible to install 2BizBox on my boss’ notebook?” Here’s our advice: at present, if you fail to provide a clean, independent and well-performed server for 2BizBox implementation, just prepare to welcome dozens of tortures in the future. We understand that 2BizBox saves you a big amount of money for ERP Implementation, so why not spend several hundred bucks on a new computer as server?

2BizBox ERP is able to run in windows and Linux system. After your server’s in place, we recommend you to install Windows Server or Linux CentOS 5. Don’t forget to set a proper account for the server and make sure there’s no extra account left. Any safety strategy on 2BizBox is useless if you leave your door open.

2. 2BizBox security setting

The first thing after you install 2BizBox on the server is to set Username and Password for the admin account. For official operation, you must use “Default Company” instead of “Test Company”. The Admin account owns the highest permission in system, therefore, you have to set a secure password and memorize it.

The second step is to strengthen safeness for other users. For example:
Encrypt and store all users’ password, this is a default setting;
Enforce all users to use password over certain length, generally set 6 byte and at least set 4
byte;
Set other password strategies, e.g. enforce users to change password regularly, like a 30
days period

Find settings for password management in:
 2BizBox ERP -> Control Panel -> General Setting -> Security Policy


By finishing the above security settings, you will definitely receive complains from all departments, e.g. for this troublesome and timed task to change password. Every day someone will forget his password but even admin cannot regain it. The only way is to reset the password by admin and revise it by user again. We have to say, the seemingly inconveniency do brings safety to your system. “Hey buddy, do me a favor. Login into the system and help me to approve an order. My password is ******”. Doesn’t it sound familiar after you’ve been a senior staff in the company? Any password will lose its safety as time passes. Think about the loss caused by information leak, your elaborate drawings, product prices and staff salaries, doesn’t it deserve a bit attention on security maintenance?

The following image shows that an attempt login with unsatisfied length password will be forced to change password or exit after you set the password minimum length.


3. Assign permissions for each user in 2BizBox.
About the relationship among user, role and permission, you can read the article:
Understanding relationship among “permission”, “role” and “user”

Permission is complicated and different from company to company. In 2BizBox, we define permission to each function. With such small granularity, you are able to assign very fine-grained permissions to each user. Though it is operable, in practical cases, there’s no necessary to make such permission assignment because we’ve preset a few roles according to the module distribution. With these roles integrated by certain permissions, you can flexibly assign roles to a user in a very short time.

We would like to kindly remind you a few special and sensitive functions like: download drawings, check system diaries, add users, check financial reports, adjust warehouse costs, etc. In case information leaks out due to imprecise definition, check system diaries at the first time and make adjustment so as to obtain a safe ERP for your enterprise.

Finally, if you have certain knowledge in database, you can revise username and password in default database. Create a new account, set password and revise the mysql-ds.xml configuration files under deploy category, then 2BizBox is able to obtain your information.

2012/06/25

Build Your Personalized Home Page for 2BizBox ERP

After login into 2BizBox, the first thing you see must be the welcoming page with a huge 2BizBox logo and hyperlinks to introductions of the software. With this information, beginner users of 2BizBox can reach to the website quickly when operating the system.  


To return to this page, click “Company Home Page” button  at the top of the model tree in the right side of the system.


Actually this is a customized page. You can edit the content as you like by clicking “2Update” button in the lower-left corner of the home page


Pitch on any line on the edit interface, property and value of this subject become visible and editable.


 On the right side of the interface, you can edit the name, font and color of the text, or add images.

At the bottom of the interface, you can add hyperlinks to the display text, or document which was set in 2BizBox.

You may have noticed a function bar on top of the edit interface.

On the bar, we designed four subjects for you to design your home page. Drag these icons down to create a new subject. Pitch them to edit.


Text:
It allows you to add and edit text on the homepage, e.g. 2BizBox homepage is set by text. You can set the font and color of the text, or add hyperlink to it.

Image:
Add image on the homepage. You can replace the “computer icon” with image in your computer and set hyperlink to it.

Group: add a group of text message and it will be shown on all homepages.

Sub-homepage: Hyperlink to the next homepage. Yes! 2BizBox allows you to add multiple homepages if you have much information to display.

Finally let’s see a sample of homepage.


2012/06/18

Small Encyclopedia of Inventory Information


In 2BizBox “Part Master Properties” lists three rows of numbers for the part’s inventory information. These numbers show the part’s status in different links: where the part is, how it is used, how much it costs and so on. Inventory information is the basis of a manufacturing enterprise. Making clear for these numbers will greatly improve your understanding of 2BizBox ERP.


On Hand: Quantity of the part that is available in your warehouse.

Available means the part is ready for use or sale, without any quality problems. The parts might be scattered in many storage locations, even in different companies if you’ve enabled multiple warehouses. Click buttonto see detail locations of the part.


On Demand: Quantity of the part your enterprise is demanding for.
Where does demand come from? Basically demand is driven by two factors: commodities in sales order and materials required by work order. When your customer needs 100 Part A, you create a sales order and approve it. In this way you create the demand for 100 A in 2BizBox system. After that, you set up A for manufacture and find the work order requires 100 Part B and 100 Part C. Again you create the demand for 100 B and 100 C. Different from MRP, On Demand Quantity reflects the actual desired parts of the system. Whether your storage of A, B or C is enough for sale or manufacture or not doesn’t change On Demand Quantity. It is the decision of system operator to buy or manufacture to meet these demands.

On Order: Quantity of the part that is being purchased or manufactured.
That is to say, items in approved purchase orders and work orders increase On Order Quantity of the part. Purchase order and work order brings more parts into the system. While these orders are in process, the parts are “ordered”, waiting to be received to the warehouse. Once these orders are finished, On Order Quantity turns to inventory.

InWIP: Quantity of the part that has been issued to the work order.
Work order tells what product to produce and what materials to issue. When warehouse issues part to work order, part inventory decreases and part InWIP increases. After the work order is finished, part InWIP disappears because the raw material has been consumed or processed to a finished product.

InSIP: Quantity of the part that is waiting to be shipped.
In 2BizBox, the “Proforma Shipper” function enables you to ship together sales orders to the same address. After adding sales orders to “Proforma Shipper”, it may still take several days to package and box up. Before shipping, quantity of these products remains in system as InSIP. Part InSIP only exists after the “Proforma Shipper” is created and Packing Box Item is added. At the same time, part inventory decreases. By finishing the “Proforma Shipper”, Part InSIP disappears.

InSIT: Quantity of the part that has been purchased and on the way of transportation.
To see the number of Part InSIT, you need to enable “Vendor Online” function. Before shipping, your vendor should operate online shipping to the related purchase order. After you receive the parts to your warehouse, Part InSIT decreases and inventory increases.

On Loan: Quantity of the part that is lent out for temporary use.
2BizBox keeps record of the part or tool lent out in “OnLoan” box. You can check the detail loan information by clicking button aside. When returning the part to warehouse and closing the loan order, On Loan turns to On Hand.

InQA: Quantity of the part that is being inspected for Quality Assurance.
Part that is being inspected has various problems and therefore cannot be used in the system. Part InQA is a vital number indicating the quantity of unqualified parts and is created by NCR. After quality inspection, the part goes to several places: return to warehouse after repair; return to warehouse after waiving or degrading; discard as useless part and scrap. After corresponding process is done in NCR, InQA number disappears accordingly.

List Price: User-defined Official quotation. It appears on sales order part item price after set in part properties.

Avg Cost: The part’s average cost calculated by system. Do not make informal adjustment.

Std Cost: The part’s Standard cost. Similar to List Price, Std Cost is defined by enterprise user to calculate Avg Cost. E.g. Std Cost can be the part’s purchasing price, manufacturing cost, etc.

Last PO # & Last PO Cost: Record of the part’s last purchase price and purchase order number. Some enterprises use “Last Purchase Cost” to do cost accounting because they consider it as a proper cost of the part in current market.

Part Class: Particularly used in inventory cycle counting, Part Class separates specific counting cycles for different parts. The setup of Part Class is based on Pareto principle, also known as ABC-analysis.

Min Qty & Max Qty: Min Qty is also called safety stock in inventory management. It describes a level of extra stock that is maintained to mitigate risk of stockouts due to uncertainties in supply and demand. Enterprise must supply for the part when “Part On Hand” is less than the Min Qty. Max Qty is the Maxim quantity of storage that the enterprise is willing to bear. Both Min Qty and Max Qty will influence MRP

Qtr Usage & Yr Usage: Qtr Usage is the Quantity of the part that is used in the last quarter. Yr Usage is the Quantity of the part that is used in the last year. For enterprise managers and warehouse operators, with these numbers, they are able to know the consumption of particular parts.

These are very basic explanations for inventory information. Some numbers are defined by users while others are changing with business orders. You can comprehend them by operating 2BizBox system and see how inventory information change with orders. There’s no need to memorize, because numbers are generated, transferred and disappeared as the system runs. We strongly suggest you to make very clear of these numbers because soon you’ll find you’ve learned to use 2BizBox ERP already!

2012/06/10

How to manage outsourcing task with 2BizBox? Part Two: Detail Steps


This is a example in 2BizBox to manage outsourcing task Situation One:
The outsourcing factory takes raw materials and creates finished products.

Step One: Create a work order for your target product.

Step Two: Approve the work order and set up

Step Three: Create a purchase order, add item NA

Step Four: in “Update purchase order item”, write NA description, cost and add the WO as Reference Doc.


Approve the PO, and you can see the purchase order as follow, as well as the related WO.


Step Five: issuing raw materials to the WO, not to the workshop, but to the outsourcing factory.

Step Six: When outsourcing factory finished product, firstly receive the PO to WO.

After that, you will see in the part detail of the WO, NA has been added as an item and the issued cost is the outsourcing fee.

Step Seven: Finally, receive the WO. 

How to manage outsourcing task with 2BizBox? Part One: 6 Situations


Many companies outsource various tasks to reduce cost or make up for technical deficiencies, so as to focus on their core business. Generally, outsourcing is divided into six situations:

1. The outsourcing factory takes raw materials and creates finished products.
2. The outsourcing factory takes raw materials and creates semi-finished products.
3. The outsourcing factory takes semi-finished products and creates finished products.
4. The outsourcing factory takes semi-finished products and creates semi-finished products.
5. The outsourcing factory prepares raw materials and creates semi-finished products.
6. The outsourcing factory prepares raw materials and creates finished products.

How many situations have your company come across? Do you always feel puzzled to manage these complicated situations? No extra functions, now 2BizBox provide you very simple solutions.

Obviously situation 6 can be treated as a normal purchasing progress. So we will see how to manage situation 1 to 5 one by one in 2BizBox.

Tips:
Before you start, make sure you understand two things in 2BizBox.
1. What does NA mean?
2. Do you understand relationships between “Reference Documents”?

If not, we recommend you to read following articles first.

Situation One: The outsourcing factory takes raw materials and creates finished products.

Just consider this situation as: we make work orders, we issue raw materials to outsourcing factories and we receive finished products into warehouse. The only thing different from a normal work order is: instead of the manufacturing process, we have to pay the outsourcing fee. In order to show the fee in this work order, we should relate a purchase order with item NA as the processing fee, and receive NA to the work order. In this way, the processing fee will be automatically calculated in the cost of this work order.

Here is the work flow chart:
Please find detail steps in 2BizBox at: 

Situation Two: The outsourcing factory takes raw materials and creates semi-finished products.

Similar to Situation One, outsourcing semi-finished products need to create WO and PO with NA as outsourcing fee. However, after the outsourcing factory finishes their job, we should receive the PO only, because these semi-finished products are still in the work sequence. Warehouse will receive the WO till all sequences finished.

Flow chart as follow:

Situation Three: The outsourcing factory takes semi-finished products and creates finished products.

Regarding the outsourcing task as one working process in the work order, we create a normal work order for the target product and set up manufacturing. When the semi-finished product is completed, create a purchase order with item NA as outsourcing fee and relate it with WO. Prepare a “transfer processing order” and send the semi-finished product to the outsourcing factory. After the outsourcing factory returns the finished-product and passes quality examination, receive the NA purchase order first and then receive the work order.


Flow chart as follow:

Situation Four: The outsourcing factory takes semi-finished products and creates semi-finished products.
If you have the patience to read, you might have found that solutions are very similar to each other as long as you understand NA and reference documents very well. Still, we create a normal work order for the target product and set up manufacturing. When the semi-finished product is completed, create a purchase order with item NA as outsourcing fee and relate it with WO. Send the semi-finished product to the outsourcing factory. After the outsourcing factory returns the finished-product and passes quality examination, receive the NA purchase order first and then transfer the semi-finished product to the next working process. Warehouse will receive the WO till all the working processes are finished.

Situation Five: The outsourcing factory prepares raw materials and creates semi-finished products.
Create a work order and approve it as we usually do, but remember that do not set up manufacturing. Then create the purchase order, relate it to WO and receive the semi-finished product (NA) from outsourcing factory to WO. After that, set up the work order and transfer the semi-finished product to the next working process. Finally let the warehouse receive the work order.

Flow chart as follow:


2012/06/08

Reference Document and Its Application in 2BizBox


Sometimes we have to purchase a few parts during production, or purchase several components for an urgent sales order. For convenience, there’s no need for the warehouse to receive goods to locations because we will directly send the parts and components to related work order or sales order. To deal with these situations, we recommend you the “reference document” function.

Actually, not only the purchase order can be the reference document of work order or sales order. For example, in many SMEs, products are shipped to customers as soon as they go off the work line. Accordingly, we can relate the work order to the sales order and then receive products directly to sales order. It avoids two steps in warehouse: receiving the work order and sending products to the sales order.

The following picture shows you all possible related documents in 2BizBox.


We provide you several examples to help you understanding better about reference documents. Please note that these references only happen between items.

1. Relate quotation to sales order.
This is a very basic and simple operation in 2BizBox. Suppose your customer wants to buy 100 teapots and you send him a quotation first.


After you reach the agreement and sign the contract, you just need to copy the quotation to sales order. Click “2Copy” at the bottom and choose 2Copy to SO.


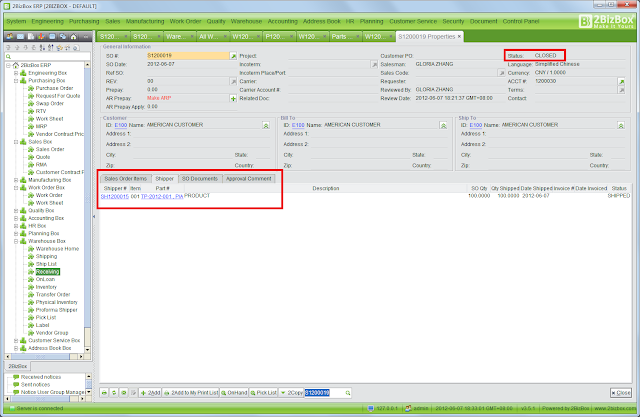
In “Update sales order” interface, you can see item 001 in Q1200002 has been a Ref. doc of item 001 in S1200019. Click “2Update” and approve the sales order.


2. Relate sales order to work order.
Suppose your teapot is composed by two parts: body and cover. You need to make a work order to assemble the two parts. At the bottom of sales order, click “2Copy” and “Copy to WO”.


Approve the WO and you can see item 001 in S1200019 has been a ref. doc of item 001 in W1200013.


3. Relate purchase order to work order.
Approve the WO and set up to manufacture. Let’s see the part detail of this work order. You need 100 bodies and 100 covers, but in your inventory there are only 90 covers. It is a very urgent sales order, so you decide to buy 10 covers from your vendor ASAP.


You create a purchase order, enter part number of teapot cover and quantity 10.


In “update purchase order item” interface, relate the work order by clicking “2Add” in “Ref Doc 2” and input WO, Item# and quantity. Keep in mind that reference happens only between items, that is why you must input item#.


Update and approve the purchase order. Now you can see the purchase order with Ref Doc W1200013.

Soon your vendor sends 10 teapot covers to you. Certainly you will directly take them to the assemble workshop. In “receive purchase order” interface, you will find the option “receive to orders”. Input quantity “10” and click “2Receive”, 10 teapot covers are issued to the work order. 

Now take a look at part detail again: quantity of on hand teapot cover is still 90. Where did the 10 teapot covers go? It has already been issued.


4. Receive work order to sales order
Finally let’s see how to receive work order to sales order. You have enough teapot covers and bodies to issue to the work order.


After 100 teapots are assembled, go to receive the work order. Since you’ve related the sales order and work order, just input quantity to receive.

Receive work order to sales order means two things:
1. The work order is closed.


2. The sales order is closed and a shipper is created at the same time.


2012/06/05

Ingenious Use of “NA” in 2BizBox


Literally NA stands for Not Applicable. Different from general part numbers, NA represents for a very special sort of thing, which might be a part, material or anything that not necessarily or easy to be given a number. We’d rather call it NA.

Let me give some examples when replacing part numbers with NA: 

1. Outsourcing costs, such as processing fee to vendors. In this situation, we can add an NA in
purchase order’s part items. 

2. Immeasurable or very cheap accessories. For example, we need a pile of rags, gloves and foamed
plastics for a worker order. There’s no need to create a part number for these accessories. Normally
what we should do is to add NA and describe its name, quantity and costs. 

3. Product that contains unfixed parts or BOMs. Many optical equipment manufacturers do not have
fixed product categories. Material, color and size changes with orders and even if they create a part
number, it might never be used ever. Therefore, we consider creating a work order for NA, and adding
necessary parts and accessories to part items so that the warehouse can issue part to the work order
normally.

Since NA represents for anything, we must keep in mind to describe it clearly in description, or even ourselves might not recognize it as time passes. Another thing is, though indefinable, NA still has quantity or cost. Do not forget to add its quantity or cost if system requires to.


Due to the flexibility of NA, we are able to process many abnormal orders. However, there are also limitations. First of all, NA has no inventory, so we cannot receive it to the warehouse and make inventory management. As a very special part number, NA cannot be recognized by 2BizBox and set related inventory. Therefore, when we purchase a pile of rags, we can receive it to work order, which means we’ve issued these rags to the work order as accessories or we can directly receive it and make AP. Sometimes we might sell an NA (e.g. a customer needs your staff to do a training and service fee is 1000 Yuan), we can directly ship it and create AR.

We introduce NA to you and tell you its advantage and shortage with only one purpose: to think and practice and finally help you improve efficiency and flexibility of your 2BizBox.

Finally let’s see a specific example of NA’s utilization. We need to buy 10 bucket of cleaning agent for the workshop. How to receive it and directly make AP in accounting box?


1.      Choose a vendor and create the purchase order.


2. Add “NA” in part item, 10 in quantity and click “add” to enter “update purchase order item”.


3. Add part description and UOM cost


4. Check and approve the purchase order


5. Go to warehouse and receive this purchase order. Since NA doesn’t have any locations, just enter the quantity “10”.


6. After receiving, the purchase order is closed and system automatically creates the Receiver. Click “2MAKE AP” to make AP.


7. Add “vendor invoice #”, “terms” and “ACCT #” to finish the AP.


8. Now we complete the process of purchasing NA, receiving and making AP.